There is no guarantee that your dog will take to the cart - please be patient with your dog as the disability can be difficult on them.
Introduction to cart
https://youtu.be/sMx1_CrsqYc
Main building video
https://youtu.be/Y8V46sNIsF8
Part 2 of building your own doggie wheelchair
https://youtu.be/ky3u44uLpeY
Video 10 (not sure if this one has already been incorporated )
https://youtu.be/sElhVoKOaGk
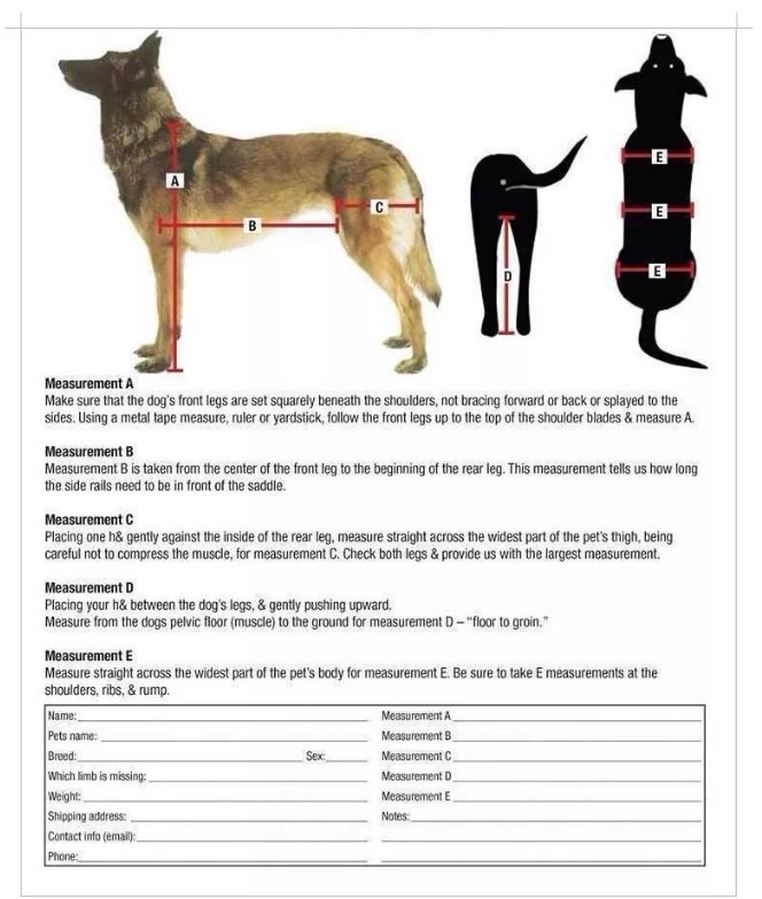
YOU WILL NEED 3 PEOPLE TO PERFORM PROPER MEASUREMENTS. One person will hold the dog, ONE person will hold the wood measurer, and ONE person will take the picture so the builders can SEE. PROPER stance and measurements are VERY IMPORTANT. If this fails, the cart will fail !!!
A brief explanation of how I use the measuring chart to construct your cart. "A" measurement is height at the shoulder blades and "D" measurement is a groin height in the rear. I split the difference between these two numbers to get my goal height of the cart. The "B" measurement + the "C" measurement tells me how long the cart is overall. "C" tells me how wide to make the x saddle and "B" tells me how long the cart is from the front of the x forward. The "E" measurement is width of the dog and really I only need the widest point which is usually the rib-cage area or front shoulders.
BUILDING TIPS
The hardest part is going to be seating the joints together. They are a very tight fit and the glue dries fast so want to get it lined up as quickly as you can, and push it in as hard as you can. You might want to have a rubber mallet to pound it down in and then make sure to straighten it IMMEDIATELY . Each fitting must take place in under 20 seconds I would say. Which is doable as long as you know that is the case. Use a square or another device to help you line things up and make sure that the legs are perpendicular on a flat table to make sure that parts are the same height. You can always trim things up but it is very hard to add things on.
If you need questions answered or other advice please email me [email protected]
Dawn
Introduction to cart
https://youtu.be/sMx1_CrsqYc
Main building video
https://youtu.be/Y8V46sNIsF8
Part 2 of building your own doggie wheelchair
https://youtu.be/ky3u44uLpeY
Video 10 (not sure if this one has already been incorporated )
https://youtu.be/sElhVoKOaGk
YOU WILL NEED 3 PEOPLE TO PERFORM PROPER MEASUREMENTS. One person will hold the dog, ONE person will hold the wood measurer, and ONE person will take the picture so the builders can SEE. PROPER stance and measurements are VERY IMPORTANT. If this fails, the cart will fail !!!
A brief explanation of how I use the measuring chart to construct your cart. "A" measurement is height at the shoulder blades and "D" measurement is a groin height in the rear. I split the difference between these two numbers to get my goal height of the cart. The "B" measurement + the "C" measurement tells me how long the cart is overall. "C" tells me how wide to make the x saddle and "B" tells me how long the cart is from the front of the x forward. The "E" measurement is width of the dog and really I only need the widest point which is usually the rib-cage area or front shoulders.
BUILDING TIPS
The hardest part is going to be seating the joints together. They are a very tight fit and the glue dries fast so want to get it lined up as quickly as you can, and push it in as hard as you can. You might want to have a rubber mallet to pound it down in and then make sure to straighten it IMMEDIATELY . Each fitting must take place in under 20 seconds I would say. Which is doable as long as you know that is the case. Use a square or another device to help you line things up and make sure that the legs are perpendicular on a flat table to make sure that parts are the same height. You can always trim things up but it is very hard to add things on.
If you need questions answered or other advice please email me [email protected]
Dawn
Notes for Building a Cart
*******Pictures will not post in this section, so I have connected a link here for the document WITH pictures******* (you may have to copy and paste into your browser if link doesn't connect)
Measurements:
https://www.dropbox.com/s/msrie4lz04wv121/measurements%20request%20email.docx
Building a Dog cart; pictures from start to finish!:
http://www.flickr.com/photos/54168480@N08/sets/72157630903283124/
Materials we prefer:
Measurements
Tools and Materials
Tools needed:
Materials List (Large Dog >35 lbs):
VERY IMPORTANT TIP
What is more important than good measurements? NOTHING!
Bad measurements = bad cart. Guaranteed!
CONVERTING DOG MEASUREMENTS TO CART MEASUREMENTS
Note: All cart measurements should be taken on the inside of the PVC (don’t count the PVC when measuring the cart).
The Dog Measurements (A - E) are used to determine:
Cart Height
Width
Wheel Placement
Before you can start building the cart, you will need to cut all of the PVC pipe needed, for convenience:
2-B” pipes
2-Total cart length- B” pieces
2-(Total height of cart) – (2.5”) - (the radius of the wheel (which is 1/2 the height of the wheel)) +((1.25” on a small dog cart (a 4” wheel) and 1.75” on a larger dog cart (6 inch wheel)
***If you are building a LARGE cart with, double tube bracing in the back, this will be different****
1-Total width of cart for small dogs (2 or 3 for large dogs)
2-1.25”
2- 2.5” for small dogs and 4 inches for large dogs
(Step 1) (Step 2) (Step 4) (Step 4) (Step 4)
Tip:
I would recommend waiting until you are done building the cart, before gluing everything so that you can try it with the dog and make adjustments if necessary .
Building the Cart
Tip
If you are making this cart for a bigger dog and you are going to put the wooden dowels in the PVC pipe do that as you assemble each piece onto the cart.
Step 1: Take your 2, 90 degree joints and connect them to either side of your width piece. (Make sure that both of the 90 degree joints are facing the same way and level)
Step 2: Attach both of the short length pieces to the 90 degree joints
Step 3: Assemble the two joints that will attach the height pipes, all you need to do is put the 1.25” PVC pipe into the T-joints, then put the 45 degree joint onto that. (Make sure that the 45 degree joint is perpendicular to the T-joint)
Step 4: Now attach your 45 degree joint to your T-Joint and leg.
Step 5: Attach the two joints you made in the last step onto the open ends of the short pieces from Step 2 (Make sure that the joint are so that the open ends will be facing straight up if the cart was upside down; use a square, level or other standing straight edge to be certain)
Step 6: Attach the 2 longer length pieces to the open end of the T-joint (Not the 45 degree joint that is facing up)
Tip:
If you are using dowels, drill through the dowel in Steps 7 and 8
Here are your axle tubes. By now you know how tall your cart is going to be. Which is about midline of the dogs body. Lets say your cart height is going to be 18". Your wheels are going to be 12", so we have a 6" radius and the cart frame is turned upside down. Measure how high it is up to the center of the 45 that you have already installed, it should be around 4 inches. So cart is 4", the wheels have a 6" radius that means this part assembled must be at least 8 inches to the center of the axle hole. I always drill multiple holes with a middle hole being the one that meets my goal height. The others will be used for fine adjustment if needed. I install 3/4 wooden dowel in these pieces on every cart that is 3/4 pvc. This piece can always be a couple of inches longer than needed with a couple of more holes and you can cut off after you are happy with the fitting. The screw that you see on the right is to hold the wood dowel into place. I drill 3/8 holes 3/4 apart. This one has 4 but like I said it can be longer and more holes to start. The holes will be drilled perpendicular to the leg of the T just as shown. I try to keep the straight pieces fairly close in length so that the lower support will be about midway and support these axle tubes a little better. Too high and you get more flex and lower will decrease flex.
Step 7: Drill holes at the bottom of the height piece, the first one should be the total height of the cart-the radius of the wheel you are using (This hole should be all the way through the pipe)
Step 8: Now you will drill about four more holes, two up, two down. With a small dog the holes should be ½” apart, with big dogs the holes should be ¾” apart (all these holes should be parallel to the one you made in the last step)
Step 9: Attach the wheels into the middle hole (the one you drilled first) using a bolt, washer, and a nut. (Do this on both sides)
9a. Thread a washer onto the bolt
9b. Put the bolt with the washer through the hole in the PVC
9c. Screw the washer onto the the bolt to secure them together
Step 10: Using the bolt cutters cut off the extra bolt leaving about ¼” left
Step 11: Attach the height pipes (with the wheels on) to the open holes in the joints (Making sure the wheels are facing the same way with the long parts of the bolts sticking out.
Now that the rest of the cart is done we will add the straps .The three straps we will use on the cart (the saddle, yoke, and chest) I make are made out of 1” wide webbed straps like leashes are made out of.
Tip:
You can go to the dollar store and purchase a leash or collar and cut it up to make the straps from and to use the side release clips
Step 12: Measure out where the Saddle straps are going to be screwed into the cart (This measurement is in the Converting dog measurements to cart measurements section) and mark it off with a pen.
Step 13: With the help with someone else hold the straps up against the places where the saddle will be attached with the screws (that you found in the last step) and measure how far the middle of the strap is adjusting the length of the straps until it right height from the ground (This measurement is in the Converting dog measurements to cart measurements section)
Step 14: Cut the straps where you marked the in the last step
Step 15: Use a hole punch, or a soldering iron (I would recommend the iron over the hole punch because it will melt and solidify the hole) to put a hole in the straps.
Step 16: Put a washer on the screw and drill through the hole in the strap and into the PVC pipe where you marked in Step 12 (Do this for all four corners for the saddle)
Step 17: For the Yolk strap you will eyeball how long you think the strap should be, making sure to make the strap longer rather than shorter, then mark where you were measuring from on the PVC, it doesn't have to be exact because you will be able to adjust it later. (Make sure this strap is directly above the dog's front legs)
Step 18: Cut the strap about 2-3in up from one of the sides and attach the small piece to one side of the side release clip and the long end to the other.
Step 19: Use a hole punch, or a soldering iron (I would recommend the iron over the hole punch because it will melt and solidify the hole) to put a hole in the straps
Step 20: Put a washer on the screw and drill through the hole in the strap and into the PVC pipe where you marked in Step 18 (Do this for both sides)
Step 21: Measure and cut the chest strap, The strap should be significantly bigger than the width of the cart. (You will be able to adjust this strap later)
Step 22: Now you will mark where the holes for the straps will go. These marks should be about ½” back from the front of the cart on the outside.
Step 23: Use a hole punch, or a soldering iron (I would recommend the iron over the hole punch because it will melt and solidify the hole) to put a hole in the straps
Step 24: Put a washer on the screw and drill through the hole in the strap and into the PVC pipe where you marked in Step 22 (Do this on both sides)
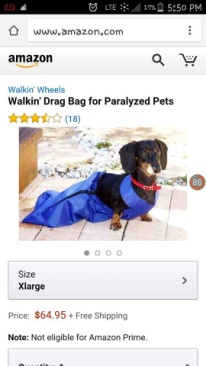
Steps 25 through 28 are only if you are making the cart for a dog whose dogs back legs do not work at all and would be dragging on the ground.
Step 25: Cut and measure the straps for the dogs legs to hang in, these straps should be D+2” long (You will need two of these)
Step 26: Mark where the hanging straps should go, these should go on the side piece behind the wheels close to the 90 degree joints (The markings should go on the inside of the cart)
Step 27: Use a hole punch, or a soldering iron (I would recommend the iron over the hole punch because it will melt and solidify the hole) to put a hole in the straps
Step 28: Put a washer on the screw and drill through the hole in the strap and into the PVC pipe where you marked in Step 26 (Do this for both sides)
Tip:
The cart, if built properly, shouldn’t extend beyond the dog’s shoulder blades.
How to tell if the Dog Cart Measurements are good
When the cart is adjusted properly, the animal stands in a ‘natural’ position. Basically, the dog wheelchair should relate to the dogs skeleton with the siderails supporting him like a spine and the wheels supporting him like legs. Here’s what to check. Refer to the figure below.
A – Knuckle at the hips. The knuckle – or the place where the legs join the frame of the dog cart, should be at the dog's hips. If you were to draw an imaginary line from one knuckle to the other, the line would pass right through the dog’s hips… where the bone of the leg meets the bones of the body. If not, tighten harness and/or adjust length.
B – Front Support loop at the shoulder. There is naturally some downward pressure at the front of the cart. This is the normal pressure of standing. It is important that this weight be directly on the top of the front leg… where it is meant to be. The loop on the front harness that the bar goes through should be at the shoulder. Adjust the straps so that the loop is held firmly against the shoulder.
C – The dog's back needs to be straight or arched UP (slight hunch). In this photo the dog’s back is arched down a little. This is NOT correct and this dog needs the Belly Strap.
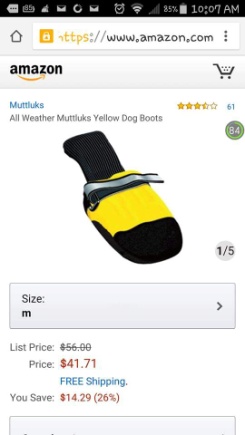
D – The back legs need to be just touching, or just off the ground, depending on the health of the back legs. If the dog wants to use his back legs, then allow his feet to touch lightly. This is often adjusted by tightening the straps that hold the harness to the frame – this brings the dog’s seat up. (Take the dog out of the harness before adjusting.) If the height of the harness cannot be changed, then lengthen the leg struts. Consider boots if the feet drag. Use the stirrups if the dog cannot use his back legs or the feet are dragging on the ground.
E – The horizontal bar needs to be level with the ground. If the cart itself cannot be adjusted, the harnesses can often be adjusted so that the horizontal bar is level with the ground – or even with the dog’s spine.
When you get here and the measurements for the dog wheelchair look good I would go back and glue all the pieces together
Typical Problems with a Dog Wheelchair
Dog will not move the cart. Most of the problems a new dog wheelchair will encounter involve the fit and the temperament of the animal. On the one hand, we’ve seen dogs for whom, the moment they’re put in a dog wheelchair, are off and running; even if they haven’t walked in months. In the best case it’s like a light turns on and they’re free. On the other hand, though, some dogs will completely reject the idea of the cart at first; frightened of the apparatus and confused at how to work it.
First, be sure the cart is a good fit. Because it is nearly impossible to measure a dog accurately, the cart may require some adjustment. If you have a custom made cart, this may require sending it back to the factory. If it’s an adjustable cart, adjustments can be made on the spot. See the section of this article on fitting. If the dog had hot spots or sores, make sure they are not being aggravated.
Second, be sure the dog is comfortable. Check the harnesses, seat, and any clips. Be sure the dogs genitals are not in an uncomfortable position, that no straps are digging into the animal, or nothing is pinching him. Adjust if necessary. Neoprene, the material that some harnesses are made of, can be safely cut without fear of edges fraying.
Third, be patient. Coax gently. Use treats. Sometimes, all the dog has to do is figure out that he or she can move.
Often, a dog will move backwards in the cart. This is normal. Four-legged animals learn to use different legs for braking, propulsion, stability, and direction. When in a cart, all of these functions are controlled by the front legs alone. If the common stance of a dog involves putting his front paws forward then he us counting on his back legs to keep him from moving backwards. When his back legs are replaced by wheels, he’ll roll back. Also, a dog in a wheelchair will move backwards when he tries to sit down.
Keep control of the dog while he moves for the first time. Do let not him run loose. There are several reasons for this:
Dogs, like horses, pee and poop standing up. This should be no problem in a wheelchair. If he does have a problem, it could be that the harnesses are constricting him. Watch to make sure that he can do his business in the wheelchair. If he cannot, then adjust as needed. If the dog is unable to go due to nerve damage or disease, you will need to express your dog. See your veterinarian to learn how to express your animal (it’s REALLY easy once you know how). If an animal’s bladder is not completely emptied several times a day, serious complications can result.
Info from:
www.DogKarts.com
For more photos go to Flickr page:hobby9t For more information, use these links:
www.DogKarts.com
http://dogwheelchairs.blogspot.com/p/compare-dog-wheelchairs.html?m=1
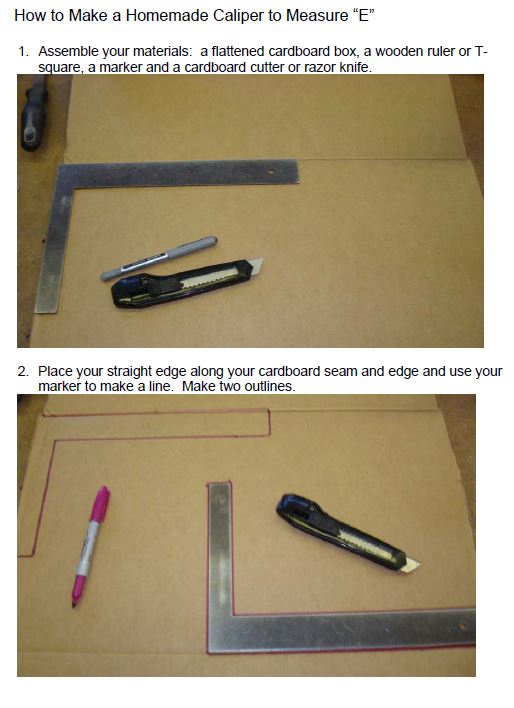
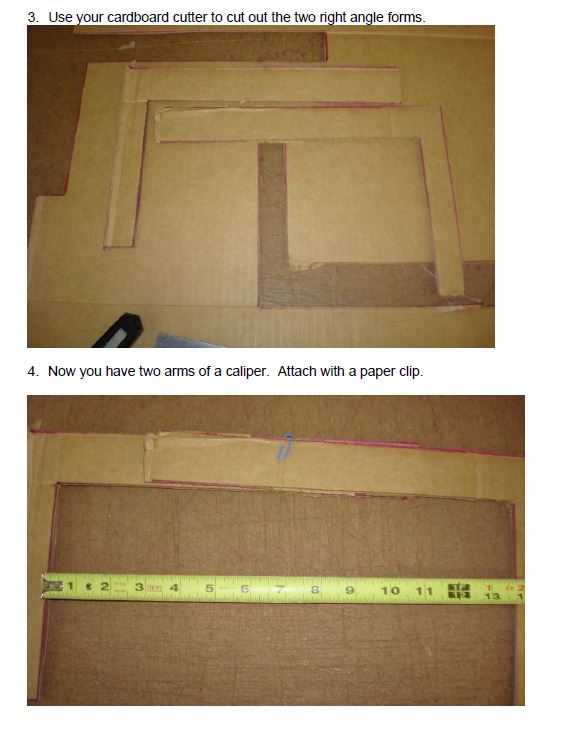
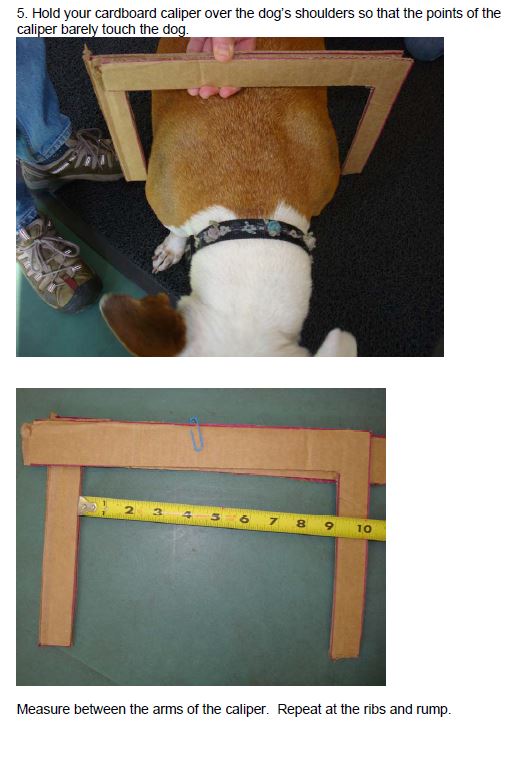
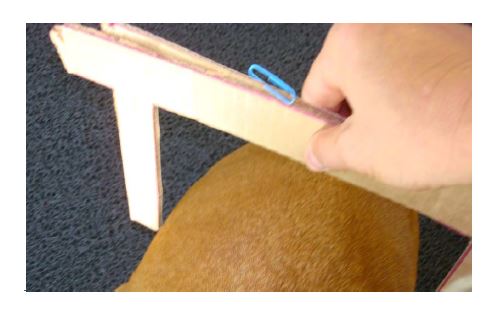
What is more important than good measurements? NOTHING! If the measurements are bad the whole cart is bad, guaranteed! Take your time. Use only hard tape measures or yardstick. All measurements are straight line. Hair does not count. Ask someone to help if only for a second opinion.
If you need a cart please look at the measuring chart and get me these measurements. Please remember that if your measurements are not good the cart will not be good. Do them multiple times and enlist help if you cannot do them on your own.
Measuring your dog and sizing your cart. First thing that needs to happen is measuring. The A measurement is the height of the dog at the hips. If they are unable to stand try and hold them up to where it looks like a natural posture for them. The B measurement is from the middle of the shoulder blades to the base of the tail. Feel for the shoulder blades and measure from the center to right where the tail starts. E measurement is the height to the shoulder blades. F is the width of the front and G is the width of the rear. The H measurement is the height to the groin area which is going to tell you how high your saddle will need to be to suspend or support your dog in a natural posture. Usually a dog that needs a cart is going to be smaller on the rear than the front but to build your cart you will use the wider of the two as the inside width of the cart. If the rear is much smaller, padding can be used to fill the void. You want the cart snug to the dogs body. I usually try to go a 1/4 to 1/2" wider, no more than that.
To determine the height of the cart I look at how tall and height to the groin. If the dog is 24" to the rear and the groin is 16" I try and make the carts height midline of their body which should be about 20". If I have them in front of me that's all I actually measure is up to the midline and that's my goal height. So staying with these measurements as an example I’m looking for 20" and will be using a 12" wheel. A 12" wheel has 6" radius so now the height of the cart to the centerline of the axle bolt hole will be 14". With a 12" wheel or bigger I usually will make the axle tubes a little long and drill 4 or 5 holes for height adjustment, with the center hole being my original goal height. I drill the holes 3/4" apart so I have 1 1/2" of adjustment up or down. This comes in very handy. So now we know how wide and how tall the cart is going to be, now look at how long. If the measure from the shoulder blades to the base of the tail is 18" then I usually add 2-3" to that. There’s no reason for the cart to go past the shoulder blades, there should be enough room for the shoulder strap and that’s it. The position of the axle is going to determine how much weight is the cart puts on the dogs shoulders. The farther back the wheels are the more there will be on the shoulder and the farther forward there will less to none.
As a point of reference the center of the dog’s hip is what you’re looking to position in front of, the center of, or behind the axle. Front=More, Center can = neutral and behind will counterbalance the cart which will provide an upward pressure+. You can ask your vet which setup you may need. Older dogs and dogs weak in the front legs will need neutral or counterbalanced and dogs with strong front legs take a standard cart. I am going to try and show some stuff this weekend on how I do the saddles and straps because I will be building carts all weekend. I have never tried to explain this stuff before so leave me feedback as to what I need to do better. I'm sure I'm missing stuff so let me know. Look at the attached measuring chart and my Flickr site that I will post again next and start asking questions.
Large dog cart video from start to finish!:
http://www.flickr.com/photos/54168480@N08/sets/72157630903283124/
hobby9t
For information on injuries and mobility please check out:
http://www.dodgerslist.com/
We have not completed our 501c(3) application process yet.
http://dogwheelchairs.blogspot.com/p/compare-dog-wheelchairs.html?m=1
Is a wheelchair right for my dog?
Paralyzed Dog: The most obvious candidate for a dog wheelchair is an animal that can get around by dragging his back-end behind him. These dogs, due to paralysis, injury, or disease are otherwise healthy, but have no feeling or control of their back end. The fact that they are able to drag themselves along with their front legs suggests that they are strong enough to be nearly completely mobile in a rear wheel wheelchair.
Weakness: Older dogs, and animals with arthritis, muscle soreness, and in the beginning stages of degenerative disease can use a wheelchair when they get tired. If the wheelchair can be taken with you on a walk, it can be put on the dog at the first signs of tiredness. This avoids a common problem of taking a long walk with a older dog and having him lie down while still miles away from home.
Three Legged Dogs: Tripods are not usually considered “Handicapped Pets” because they can run and play and be as active as 4 legged dogs. Once they get used to the loss of their leg they can often compensate to nearly 100%. One very important point to remember though is that the body will shift for compensation and this can and will cause changes in the spine which could lead to paralysis itself.
There is, though, another danger. It is critically important, with a three-legged dog, that the remaining leg be cared for with a great deal of vigilance; should this leg fail, complications can be severe. A three-legged dog should be put in a wheelchair when he get tired, or while recuperating if there is a mild injury on the remaining leg.
Rehabilitation: After surgery, or during recovery of any kind, it is often important to keep weight off the dog’s legs, back, or other area. IN many cases, this requirement can use the dog to be kept in a crate for weeks or months. This loss of activity and muscle-tone can cause complications. Using a wheelchair during rehabilitation can give the dog the exercise he needs to support the healing process and keep him healthy during recovery.
Saddle Support: K9, Eddies, and Walkin’ Wheels use a Saddle-type support (Walkin’ Wheels is mentioned under both Saddle and Sling because they can use either, or both). In a saddle support, the dog’s legs are put through rings that support the dog on a ‘seat’ or saddle. With Eddies and K9, the dogs back legs need to be lifted into the saddle. With Walkin’ Wheels the front of the saddle can be unsnapped so that the dog does not need to be lifted.
Stiff Saddle from Eddies Wheels
Flexible Saddle from Walkin’ Wheels for Handicapped Pets
Counterbalanced Carts: The position of the back wheels is important because it determines where the dog’s center of gravity is. They can be either in line with the dog’s hips, in front of them (counterbalanced cart) or behind the hips for increased stability. When a dog has strong front legs, the wheels can move toward the back of the dog. This moves the center of gravity forward. This increased stability is ideal for highly active dogs that want to jump and play, and can handle the extra weight on their front legs. If the wheels are moved forward, this moves the center gravity back and takes pressure off the front legs. This is advisable for dogs with weak front legs, but can cause problems if the dog jumps – the cart can flip backwards.
Front wheel carts: When a dog’s front legs are damaged, this can suggest the need for a front wheel cart. Instead of wheels replacing the back legs, they are placed toward the front of the wheelchair to support the front legs. Typically, the harness system of a front wheel dog wheelchair is opposite that of a rear wheel cart. (The Rolling Dog project does not make these carts, only rear wheel carts)
Quad Carts: Quadriplegic dogs, with limited use of all legs, can benefit from a four-wheel dog wheelchair. This can take most, or all of the weight off of the dog’s legs, allowing him the freedom to move or be pulled along, and get exercise. This can be excellent rehabilitation devices. (The Rolling Dog project does not make these carts, only rear wheel carts)
Dog Wheelchair Accessories
Stirrups: These straps hang off the back of the cart and can be used to hold the dog’s feet off the ground. They are used when injury can result from a dog’s paws scraping on the ground. Typically, if a dog has stronger back legs, it is recommended that the feet be allowed to lightly touch the ground. If the dog cannot control the paws; if they are knuckling or scraping, then boots are used to protect them. If the dog cannot control or use his legs, they should be put up in the stirrups. Even in the stirrups you’ll notice the legs move back and forth. This is healthy and maintains muscle tone.
Belly Belt: A dog’s spine should never be allowed to curve downward, called hyper extended. Hypo-extended or ‘hunched’ is normal. Dogs with longer bodies or weaker backs need additional support under the belly which can be provided by a belly belt. Harness Handles: Those wheelchairs that use a sling support harness often have handles that can be attached to the harness allowing the harness to be used without the wheelchair.
Carry Bag: It is extremely useful to have method for carrying the wheelchair; a bag or handles. Whether the cart conveniently folds flat like the Walkin’ Wheels or needs to be disassembled, you will need to travel with the cart. Some method to facilitate this is important.
Tools needed:
- Drill
- Drill Bit
- PVC cutter or saw
- Tape Measure
- Hole Punch or a soldering iron
- Wrench
- Small bolt cutter
- Sharpie or some type of marker
- PVC Pipe
- ½ in Schedule 40 PVC (10 ft)
- ½ in “T” Joint (2)
- ½ in 90 Degree Joint (2)
- ½ in 45 Degree Joint (2)
- ½ in Caps (2)
- 5/16 in x 3 in Full Thread Bolts (2)
- 5/16 in Lock Nuts (4)
- 5/16 in Cap Nuts (2)
- Nylon webbing ( 1 in width) (8 ft) (Note: old leashes may work) Amazon.com
- Side Release Buckles (1 in width) Amazon.com
- Brass eyelets w/ toothed washers (optional for saddle or straps)
- #8 self-tapping screws (10 or more)
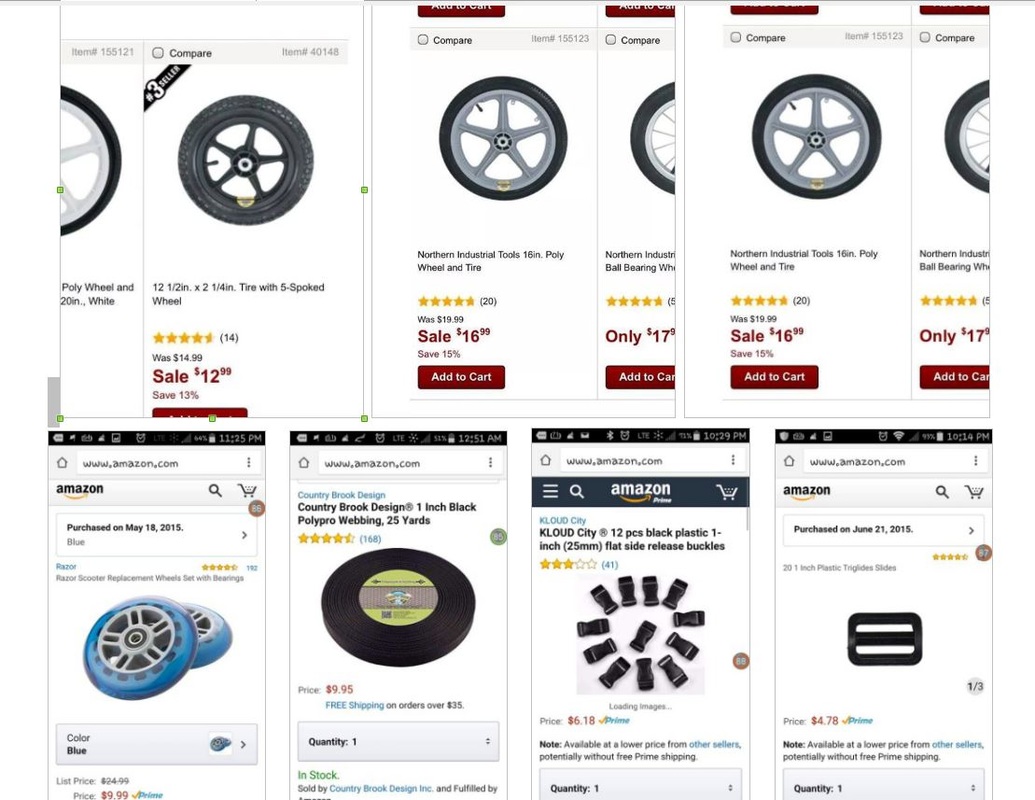
- 98 mm, 100-150 mm Razor Scooter Wheels with bearings (2) Amazon.com or local sporting goods store
Materials List (Large Dog >35 lbs):
- PVC Pipe, Primer and Glue
- 1/2 in PVC Schedule 80 PVC (10 ft)
- 1/2 in “T” Joint (4)
- 1/2 in 90 Degree Joint (4)
- 1/2 in 45 Degree Joint (2)
- 1/2 in Caps (2)
- 5/16 in x 3 in Full Thread Bolts (2)
- 5/16 in Lock Nuts (4)
- 5/16 in Cap Nuts (2)
- Nylon webbing (1 in width) (Note: Old leashes may work) Amazon.com
- Side Release Buckles (1 in width) Amazon.com
- Brass eyelets w/ toothed washers for straps if not using buckles (Total)
- #10 self tapping screws (Total)
- Wheels (2) (Note: Northern Tool Supply Company for larger dogs is a good source) need to have bearings (Dachshunds and other small dogs can use 98mm Razor Scooter wheels from the sports store or on Amazon; Medium sized dogs such as Corgis, Bassett Hounds and similar are best with 8 inch wheels from Northern Tool Supply item #155124, Larger dogs use 12” and 16” wheels from Northern.
- Wooden dowels: As necessary to put inside the PVC pipe for extra support.
VERY IMPORTANT TIP
What is more important than good measurements? NOTHING!
Bad measurements = bad cart. Guaranteed!
- Take your time.
- Use only a hard tape measure or a yardstick.
- Make sure measurements are a straight line.
- Don’t include the dog’s fluffy fur/hair in the measurements.
- Ask someone to help for a second opinion.
- Take multiple measurements and DOUBLE CHECK
CONVERTING DOG MEASUREMENTS TO CART MEASUREMENTS
Note: All cart measurements should be taken on the inside of the PVC (don’t count the PVC when measuring the cart).
The Dog Measurements (A - E) are used to determine:
- Cart Height
- Cart Length
- Cart Width
- Saddle Height
- Saddle Width
- Wheel placement
Cart Height
- Cart Height: to find the height, you need to split the difference between A and D and then add the difference on to D
- (Example) ((A-D) /2) +D= cart height
- A = 20.5" D = 15"
- ((20.5 - 15) /2 ) +15 = cart height
- (4.5/2)+D
- 2.25+ 15= cart height
- 17.25 is the cart height
- This is found by combining your C and B measurements and adding 2 1/2".
- (Example) C+ B+ 2 ½”
- 2 ½” space is for pooping. It should be in the back of the cart.
- The saddle width is C+ 1 ½”.
- The width on both sides should be the same.
- You will use measurement D, the middle of the cross should be D” above the ground
Width
- To find the width you will use measurement E, the width should be E+1/2” LOOK BELOW AT PICTURE
- You want the cart to be as close to the dog’s sides as possible to reduce body sway. If necessary you can use padding as a filler to snug the cart up.
Wheel Placement
- The back wheels will come off of the T joint. They will be either 2.5 +/- from the back of cart or 4 inches from the back for large dogs
- The center of the saddle should also be B” back from the front so the wheels should be close to the back legs
Before you can start building the cart, you will need to cut all of the PVC pipe needed, for convenience:
2-B” pipes
2-Total cart length- B” pieces
2-(Total height of cart) – (2.5”) - (the radius of the wheel (which is 1/2 the height of the wheel)) +((1.25” on a small dog cart (a 4” wheel) and 1.75” on a larger dog cart (6 inch wheel)
***If you are building a LARGE cart with, double tube bracing in the back, this will be different****
1-Total width of cart for small dogs (2 or 3 for large dogs)
2-1.25”
2- 2.5” for small dogs and 4 inches for large dogs
(Step 1) (Step 2) (Step 4) (Step 4) (Step 4)
Tip:
I would recommend waiting until you are done building the cart, before gluing everything so that you can try it with the dog and make adjustments if necessary .
Building the Cart
Tip
If you are making this cart for a bigger dog and you are going to put the wooden dowels in the PVC pipe do that as you assemble each piece onto the cart.
Step 1: Take your 2, 90 degree joints and connect them to either side of your width piece. (Make sure that both of the 90 degree joints are facing the same way and level)
Step 2: Attach both of the short length pieces to the 90 degree joints
Step 3: Assemble the two joints that will attach the height pipes, all you need to do is put the 1.25” PVC pipe into the T-joints, then put the 45 degree joint onto that. (Make sure that the 45 degree joint is perpendicular to the T-joint)
Step 4: Now attach your 45 degree joint to your T-Joint and leg.
Step 5: Attach the two joints you made in the last step onto the open ends of the short pieces from Step 2 (Make sure that the joint are so that the open ends will be facing straight up if the cart was upside down; use a square, level or other standing straight edge to be certain)
Step 6: Attach the 2 longer length pieces to the open end of the T-joint (Not the 45 degree joint that is facing up)
Tip:
If you are using dowels, drill through the dowel in Steps 7 and 8
Here are your axle tubes. By now you know how tall your cart is going to be. Which is about midline of the dogs body. Lets say your cart height is going to be 18". Your wheels are going to be 12", so we have a 6" radius and the cart frame is turned upside down. Measure how high it is up to the center of the 45 that you have already installed, it should be around 4 inches. So cart is 4", the wheels have a 6" radius that means this part assembled must be at least 8 inches to the center of the axle hole. I always drill multiple holes with a middle hole being the one that meets my goal height. The others will be used for fine adjustment if needed. I install 3/4 wooden dowel in these pieces on every cart that is 3/4 pvc. This piece can always be a couple of inches longer than needed with a couple of more holes and you can cut off after you are happy with the fitting. The screw that you see on the right is to hold the wood dowel into place. I drill 3/8 holes 3/4 apart. This one has 4 but like I said it can be longer and more holes to start. The holes will be drilled perpendicular to the leg of the T just as shown. I try to keep the straight pieces fairly close in length so that the lower support will be about midway and support these axle tubes a little better. Too high and you get more flex and lower will decrease flex.
Step 7: Drill holes at the bottom of the height piece, the first one should be the total height of the cart-the radius of the wheel you are using (This hole should be all the way through the pipe)
Step 8: Now you will drill about four more holes, two up, two down. With a small dog the holes should be ½” apart, with big dogs the holes should be ¾” apart (all these holes should be parallel to the one you made in the last step)
Step 9: Attach the wheels into the middle hole (the one you drilled first) using a bolt, washer, and a nut. (Do this on both sides)
9a. Thread a washer onto the bolt
9b. Put the bolt with the washer through the hole in the PVC
9c. Screw the washer onto the the bolt to secure them together
Step 10: Using the bolt cutters cut off the extra bolt leaving about ¼” left
Step 11: Attach the height pipes (with the wheels on) to the open holes in the joints (Making sure the wheels are facing the same way with the long parts of the bolts sticking out.
Now that the rest of the cart is done we will add the straps .The three straps we will use on the cart (the saddle, yoke, and chest) I make are made out of 1” wide webbed straps like leashes are made out of.
Tip:
You can go to the dollar store and purchase a leash or collar and cut it up to make the straps from and to use the side release clips
Step 12: Measure out where the Saddle straps are going to be screwed into the cart (This measurement is in the Converting dog measurements to cart measurements section) and mark it off with a pen.
Step 13: With the help with someone else hold the straps up against the places where the saddle will be attached with the screws (that you found in the last step) and measure how far the middle of the strap is adjusting the length of the straps until it right height from the ground (This measurement is in the Converting dog measurements to cart measurements section)
Step 14: Cut the straps where you marked the in the last step
Step 15: Use a hole punch, or a soldering iron (I would recommend the iron over the hole punch because it will melt and solidify the hole) to put a hole in the straps.
Step 16: Put a washer on the screw and drill through the hole in the strap and into the PVC pipe where you marked in Step 12 (Do this for all four corners for the saddle)
Step 17: For the Yolk strap you will eyeball how long you think the strap should be, making sure to make the strap longer rather than shorter, then mark where you were measuring from on the PVC, it doesn't have to be exact because you will be able to adjust it later. (Make sure this strap is directly above the dog's front legs)
Step 18: Cut the strap about 2-3in up from one of the sides and attach the small piece to one side of the side release clip and the long end to the other.
Step 19: Use a hole punch, or a soldering iron (I would recommend the iron over the hole punch because it will melt and solidify the hole) to put a hole in the straps
Step 20: Put a washer on the screw and drill through the hole in the strap and into the PVC pipe where you marked in Step 18 (Do this for both sides)
Step 21: Measure and cut the chest strap, The strap should be significantly bigger than the width of the cart. (You will be able to adjust this strap later)
Step 22: Now you will mark where the holes for the straps will go. These marks should be about ½” back from the front of the cart on the outside.
Step 23: Use a hole punch, or a soldering iron (I would recommend the iron over the hole punch because it will melt and solidify the hole) to put a hole in the straps
Step 24: Put a washer on the screw and drill through the hole in the strap and into the PVC pipe where you marked in Step 22 (Do this on both sides)
Steps 25 through 28 are only if you are making the cart for a dog whose dogs back legs do not work at all and would be dragging on the ground.
Step 25: Cut and measure the straps for the dogs legs to hang in, these straps should be D+2” long (You will need two of these)
Step 26: Mark where the hanging straps should go, these should go on the side piece behind the wheels close to the 90 degree joints (The markings should go on the inside of the cart)
Step 27: Use a hole punch, or a soldering iron (I would recommend the iron over the hole punch because it will melt and solidify the hole) to put a hole in the straps
Step 28: Put a washer on the screw and drill through the hole in the strap and into the PVC pipe where you marked in Step 26 (Do this for both sides)
Tip:
The cart, if built properly, shouldn’t extend beyond the dog’s shoulder blades.
How to tell if the Dog Cart Measurements are good
When the cart is adjusted properly, the animal stands in a ‘natural’ position. Basically, the dog wheelchair should relate to the dogs skeleton with the siderails supporting him like a spine and the wheels supporting him like legs. Here’s what to check. Refer to the figure below.
A – Knuckle at the hips. The knuckle – or the place where the legs join the frame of the dog cart, should be at the dog's hips. If you were to draw an imaginary line from one knuckle to the other, the line would pass right through the dog’s hips… where the bone of the leg meets the bones of the body. If not, tighten harness and/or adjust length.
B – Front Support loop at the shoulder. There is naturally some downward pressure at the front of the cart. This is the normal pressure of standing. It is important that this weight be directly on the top of the front leg… where it is meant to be. The loop on the front harness that the bar goes through should be at the shoulder. Adjust the straps so that the loop is held firmly against the shoulder.
C – The dog's back needs to be straight or arched UP (slight hunch). In this photo the dog’s back is arched down a little. This is NOT correct and this dog needs the Belly Strap.
D – The back legs need to be just touching, or just off the ground, depending on the health of the back legs. If the dog wants to use his back legs, then allow his feet to touch lightly. This is often adjusted by tightening the straps that hold the harness to the frame – this brings the dog’s seat up. (Take the dog out of the harness before adjusting.) If the height of the harness cannot be changed, then lengthen the leg struts. Consider boots if the feet drag. Use the stirrups if the dog cannot use his back legs or the feet are dragging on the ground.
E – The horizontal bar needs to be level with the ground. If the cart itself cannot be adjusted, the harnesses can often be adjusted so that the horizontal bar is level with the ground – or even with the dog’s spine.
When you get here and the measurements for the dog wheelchair look good I would go back and glue all the pieces together
Typical Problems with a Dog Wheelchair
Dog will not move the cart. Most of the problems a new dog wheelchair will encounter involve the fit and the temperament of the animal. On the one hand, we’ve seen dogs for whom, the moment they’re put in a dog wheelchair, are off and running; even if they haven’t walked in months. In the best case it’s like a light turns on and they’re free. On the other hand, though, some dogs will completely reject the idea of the cart at first; frightened of the apparatus and confused at how to work it.
First, be sure the cart is a good fit. Because it is nearly impossible to measure a dog accurately, the cart may require some adjustment. If you have a custom made cart, this may require sending it back to the factory. If it’s an adjustable cart, adjustments can be made on the spot. See the section of this article on fitting. If the dog had hot spots or sores, make sure they are not being aggravated.
Second, be sure the dog is comfortable. Check the harnesses, seat, and any clips. Be sure the dogs genitals are not in an uncomfortable position, that no straps are digging into the animal, or nothing is pinching him. Adjust if necessary. Neoprene, the material that some harnesses are made of, can be safely cut without fear of edges fraying.
Third, be patient. Coax gently. Use treats. Sometimes, all the dog has to do is figure out that he or she can move.
Often, a dog will move backwards in the cart. This is normal. Four-legged animals learn to use different legs for braking, propulsion, stability, and direction. When in a cart, all of these functions are controlled by the front legs alone. If the common stance of a dog involves putting his front paws forward then he us counting on his back legs to keep him from moving backwards. When his back legs are replaced by wheels, he’ll roll back. Also, a dog in a wheelchair will move backwards when he tries to sit down.
Keep control of the dog while he moves for the first time. Do let not him run loose. There are several reasons for this:
- The noise of the cart could frighten him, causing him to run faster. As the noise follows him, it could panic the dog.
- The dog is does not know how to use the cart. If he goes to close to a building or a wall the wheel could catch and get stuck or force him to turn.
- The dog needs to be kept away from stairs.
- In some cases, the dog could run adapt immediately to his new wheels and run away.
Dogs, like horses, pee and poop standing up. This should be no problem in a wheelchair. If he does have a problem, it could be that the harnesses are constricting him. Watch to make sure that he can do his business in the wheelchair. If he cannot, then adjust as needed. If the dog is unable to go due to nerve damage or disease, you will need to express your dog. See your veterinarian to learn how to express your animal (it’s REALLY easy once you know how). If an animal’s bladder is not completely emptied several times a day, serious complications can result.
Info from:
www.DogKarts.com
For more photos go to Flickr page:hobby9t For more information, use these links:
www.DogKarts.com
http://dogwheelchairs.blogspot.com/p/compare-dog-wheelchairs.html?m=1
What is more important than good measurements? NOTHING! If the measurements are bad the whole cart is bad, guaranteed! Take your time. Use only hard tape measures or yardstick. All measurements are straight line. Hair does not count. Ask someone to help if only for a second opinion.
If you need a cart please look at the measuring chart and get me these measurements. Please remember that if your measurements are not good the cart will not be good. Do them multiple times and enlist help if you cannot do them on your own.
Measuring your dog and sizing your cart. First thing that needs to happen is measuring. The A measurement is the height of the dog at the hips. If they are unable to stand try and hold them up to where it looks like a natural posture for them. The B measurement is from the middle of the shoulder blades to the base of the tail. Feel for the shoulder blades and measure from the center to right where the tail starts. E measurement is the height to the shoulder blades. F is the width of the front and G is the width of the rear. The H measurement is the height to the groin area which is going to tell you how high your saddle will need to be to suspend or support your dog in a natural posture. Usually a dog that needs a cart is going to be smaller on the rear than the front but to build your cart you will use the wider of the two as the inside width of the cart. If the rear is much smaller, padding can be used to fill the void. You want the cart snug to the dogs body. I usually try to go a 1/4 to 1/2" wider, no more than that.
To determine the height of the cart I look at how tall and height to the groin. If the dog is 24" to the rear and the groin is 16" I try and make the carts height midline of their body which should be about 20". If I have them in front of me that's all I actually measure is up to the midline and that's my goal height. So staying with these measurements as an example I’m looking for 20" and will be using a 12" wheel. A 12" wheel has 6" radius so now the height of the cart to the centerline of the axle bolt hole will be 14". With a 12" wheel or bigger I usually will make the axle tubes a little long and drill 4 or 5 holes for height adjustment, with the center hole being my original goal height. I drill the holes 3/4" apart so I have 1 1/2" of adjustment up or down. This comes in very handy. So now we know how wide and how tall the cart is going to be, now look at how long. If the measure from the shoulder blades to the base of the tail is 18" then I usually add 2-3" to that. There’s no reason for the cart to go past the shoulder blades, there should be enough room for the shoulder strap and that’s it. The position of the axle is going to determine how much weight is the cart puts on the dogs shoulders. The farther back the wheels are the more there will be on the shoulder and the farther forward there will less to none.
As a point of reference the center of the dog’s hip is what you’re looking to position in front of, the center of, or behind the axle. Front=More, Center can = neutral and behind will counterbalance the cart which will provide an upward pressure+. You can ask your vet which setup you may need. Older dogs and dogs weak in the front legs will need neutral or counterbalanced and dogs with strong front legs take a standard cart. I am going to try and show some stuff this weekend on how I do the saddles and straps because I will be building carts all weekend. I have never tried to explain this stuff before so leave me feedback as to what I need to do better. I'm sure I'm missing stuff so let me know. Look at the attached measuring chart and my Flickr site that I will post again next and start asking questions.
Large dog cart video from start to finish!:
http://www.flickr.com/photos/54168480@N08/sets/72157630903283124/
hobby9t
For information on injuries and mobility please check out:
http://www.dodgerslist.com/
We have not completed our 501c(3) application process yet.
http://dogwheelchairs.blogspot.com/p/compare-dog-wheelchairs.html?m=1
Is a wheelchair right for my dog?
Paralyzed Dog: The most obvious candidate for a dog wheelchair is an animal that can get around by dragging his back-end behind him. These dogs, due to paralysis, injury, or disease are otherwise healthy, but have no feeling or control of their back end. The fact that they are able to drag themselves along with their front legs suggests that they are strong enough to be nearly completely mobile in a rear wheel wheelchair.
Weakness: Older dogs, and animals with arthritis, muscle soreness, and in the beginning stages of degenerative disease can use a wheelchair when they get tired. If the wheelchair can be taken with you on a walk, it can be put on the dog at the first signs of tiredness. This avoids a common problem of taking a long walk with a older dog and having him lie down while still miles away from home.
Three Legged Dogs: Tripods are not usually considered “Handicapped Pets” because they can run and play and be as active as 4 legged dogs. Once they get used to the loss of their leg they can often compensate to nearly 100%. One very important point to remember though is that the body will shift for compensation and this can and will cause changes in the spine which could lead to paralysis itself.
There is, though, another danger. It is critically important, with a three-legged dog, that the remaining leg be cared for with a great deal of vigilance; should this leg fail, complications can be severe. A three-legged dog should be put in a wheelchair when he get tired, or while recuperating if there is a mild injury on the remaining leg.
Rehabilitation: After surgery, or during recovery of any kind, it is often important to keep weight off the dog’s legs, back, or other area. IN many cases, this requirement can use the dog to be kept in a crate for weeks or months. This loss of activity and muscle-tone can cause complications. Using a wheelchair during rehabilitation can give the dog the exercise he needs to support the healing process and keep him healthy during recovery.
Saddle Support: K9, Eddies, and Walkin’ Wheels use a Saddle-type support (Walkin’ Wheels is mentioned under both Saddle and Sling because they can use either, or both). In a saddle support, the dog’s legs are put through rings that support the dog on a ‘seat’ or saddle. With Eddies and K9, the dogs back legs need to be lifted into the saddle. With Walkin’ Wheels the front of the saddle can be unsnapped so that the dog does not need to be lifted.
Stiff Saddle from Eddies Wheels
Flexible Saddle from Walkin’ Wheels for Handicapped Pets
Counterbalanced Carts: The position of the back wheels is important because it determines where the dog’s center of gravity is. They can be either in line with the dog’s hips, in front of them (counterbalanced cart) or behind the hips for increased stability. When a dog has strong front legs, the wheels can move toward the back of the dog. This moves the center of gravity forward. This increased stability is ideal for highly active dogs that want to jump and play, and can handle the extra weight on their front legs. If the wheels are moved forward, this moves the center gravity back and takes pressure off the front legs. This is advisable for dogs with weak front legs, but can cause problems if the dog jumps – the cart can flip backwards.
Front wheel carts: When a dog’s front legs are damaged, this can suggest the need for a front wheel cart. Instead of wheels replacing the back legs, they are placed toward the front of the wheelchair to support the front legs. Typically, the harness system of a front wheel dog wheelchair is opposite that of a rear wheel cart. (The Rolling Dog project does not make these carts, only rear wheel carts)
Quad Carts: Quadriplegic dogs, with limited use of all legs, can benefit from a four-wheel dog wheelchair. This can take most, or all of the weight off of the dog’s legs, allowing him the freedom to move or be pulled along, and get exercise. This can be excellent rehabilitation devices. (The Rolling Dog project does not make these carts, only rear wheel carts)
Dog Wheelchair Accessories
Stirrups: These straps hang off the back of the cart and can be used to hold the dog’s feet off the ground. They are used when injury can result from a dog’s paws scraping on the ground. Typically, if a dog has stronger back legs, it is recommended that the feet be allowed to lightly touch the ground. If the dog cannot control the paws; if they are knuckling or scraping, then boots are used to protect them. If the dog cannot control or use his legs, they should be put up in the stirrups. Even in the stirrups you’ll notice the legs move back and forth. This is healthy and maintains muscle tone.
Belly Belt: A dog’s spine should never be allowed to curve downward, called hyper extended. Hypo-extended or ‘hunched’ is normal. Dogs with longer bodies or weaker backs need additional support under the belly which can be provided by a belly belt. Harness Handles: Those wheelchairs that use a sling support harness often have handles that can be attached to the harness allowing the harness to be used without the wheelchair.
Carry Bag: It is extremely useful to have method for carrying the wheelchair; a bag or handles. Whether the cart conveniently folds flat like the Walkin’ Wheels or needs to be disassembled, you will need to travel with the cart. Some method to facilitate this is important.
Wheels: Typically, wheelchairs come with the wheels designed for the size and type of use. For small dog, lightweight wheels are recommended. Larger dogs should have 12” or 16” wheels with internal bearings for support and ease of use. “Mountain Bike” style rubber air-filled wheels can be used for larger, highly active dogs. In any case, wheels are a ‘consumable’ part of a wheelchair and will probably need to be replaced after extensive use. This can usually be done by the owner. Wheels can be purchased from the cart manufacturer.
Typical Problems with a Dog Wheelchair
Dog will not move the cart. Most of the problems a new dog wheelchair will encounter involve the fit and the temperament of the animal. On the one hand, we’ve seen dogs who, the moment they’re put in a dog wheelchair, are off and running; even if they haven’t walked in months. In the best case it’s like a light turns on and they’re free. On the other hand, though, some dogs will completely reject the idea of the cart at first; frightened of the apparatus and confused at how to work it.
First, be sure the cart is a good fit. Because it is nearly impossible to measure a dog accurately, the cart may require some adjustment. If you have a custom made cart, this may require sending it back to the factory. If it’s an adjustable cart, adjustments can be made on the spot. See the section of this article on fitting. If the dog had hot spots or sores, make sure they are not being aggravated.
Second, be sure the dog is comfortable. Check the harnesses, seat, and any clips. Be sure the dogs genitals are not in an uncomfortable position, that no straps are digging into the animal, or nothing is pinching him. Adjust if necessary. Neoprene, the material that some harnesses are made of, can be safely cut without fear of edges fraying.
Third, be patient. Coax gently. Use treats. Sometimes, all the dog has to do is figure out that he or she can move.
Often, a dog will move backwards in the cart. This is normal. Four-legged animals learn to use different legs for braking, propulsion, stability, and direction. When in a cart, all of these functions are controlled by the front legs alone. If the common stance of a dog involves putting his front paws forward then he us counting on his back legs to keep him from moving backwards. When his back legs are replaced by wheels, he’ll roll back. Also, a dog in a wheelchair will move backwards when he tries to sit down.
Keep control of the dog while he moves for the first time. Do let not him run loose. There are several reasons for this:
Dogs, like horses, pee and poop standing up. This should be no problem in a wheelchair. If he does have a problem, it could be that the harnesses are constricting him. Watch to make sure that he can do his business in the wheelchair. If he cannot, then adjust as needed. If the dog us unable to go due to nerve damage or disease, you will need to express your dog. See your veterinarian to learn how to express your animal (it’s REALLY easy once you know how). If an animal’s bladder is not completely emptied several times a day, serious complications can result.
Fitting: How to Tell if the Dog Cart is Adjusted Properly
When the cart is adjusted properly, the animal stands in a ‘natural’ position. Basically, the dog wheelchair should relate to the dogs skeleton with the siderails supporting him like a spine and the wheels supporting him like legs. Here’s what to check. Refer to the figure below.
A – Knuckle at the hips. The knuckle – or the place where the legs join the frame of the dog cart, should be at the dogs hips. If you were to draw an imaginary line from one knuckle to the other, the line would pass right through the dog’s hips… where the bone of the leg meets the bones of the body. If not, tighten harness and/or adjust length. B – Front Support loop at the shoulder. There is naturally some downward pressure at the front of the cart. This is the normal pressure of standing. It is important that this weight be directly on the top of the front leg… where it is meant to be. The loop on the front harness that the bar goes through should be at the shoulder. Adjust the straps so that the loop is held firmly against the shoulder.
C – The dogs back needs to be straight or arched UP (slight hunch). The dog may need the Belly Strap.
D – The back legs need to be just touching, or just off the ground, depending on the health of the back legs. If the dogs wants to use his back legs, then allow his feet to touch lightly. This is often adjusted by tightening the straps that hold the harness to the frame – this brings the dog’s seat up. (Take the dog out of the harness before adjusting.) If the height of the harness cannot be changed, then lengthen the leg struts. Consider boots if the feet drag. Use the stirrups if the dog cannot use his back legs or the feet are dragging on the ground.
E – The horizontal bar needs to be level with the ground. If the cart itself cannot be adjusted, the harnesses can often be adjusted so that the horizontal bar is level with the ground – or even with the dog’s spine.
Reference Picture below:
For more information, see the www.DogKarts.com website
Dog will not move the cart. Most of the problems a new dog wheelchair will encounter involve the fit and the temperament of the animal. On the one hand, we’ve seen dogs who, the moment they’re put in a dog wheelchair, are off and running; even if they haven’t walked in months. In the best case it’s like a light turns on and they’re free. On the other hand, though, some dogs will completely reject the idea of the cart at first; frightened of the apparatus and confused at how to work it.
First, be sure the cart is a good fit. Because it is nearly impossible to measure a dog accurately, the cart may require some adjustment. If you have a custom made cart, this may require sending it back to the factory. If it’s an adjustable cart, adjustments can be made on the spot. See the section of this article on fitting. If the dog had hot spots or sores, make sure they are not being aggravated.
Second, be sure the dog is comfortable. Check the harnesses, seat, and any clips. Be sure the dogs genitals are not in an uncomfortable position, that no straps are digging into the animal, or nothing is pinching him. Adjust if necessary. Neoprene, the material that some harnesses are made of, can be safely cut without fear of edges fraying.
Third, be patient. Coax gently. Use treats. Sometimes, all the dog has to do is figure out that he or she can move.
Often, a dog will move backwards in the cart. This is normal. Four-legged animals learn to use different legs for braking, propulsion, stability, and direction. When in a cart, all of these functions are controlled by the front legs alone. If the common stance of a dog involves putting his front paws forward then he us counting on his back legs to keep him from moving backwards. When his back legs are replaced by wheels, he’ll roll back. Also, a dog in a wheelchair will move backwards when he tries to sit down.
Keep control of the dog while he moves for the first time. Do let not him run loose. There are several reasons for this:
- The noise of the cart could frighten him, causing him to run faster. As the noise follows him, it could panic the dog.
- The dog is does not know how to use the cart. If he goes to close to a building or a wall the wheel could catch and get stuck or force him to turn.
- The dog needs to be kept away from stairs.
- In some cases, the dog could run adapt immediately to his new wheels and run away.
Dogs, like horses, pee and poop standing up. This should be no problem in a wheelchair. If he does have a problem, it could be that the harnesses are constricting him. Watch to make sure that he can do his business in the wheelchair. If he cannot, then adjust as needed. If the dog us unable to go due to nerve damage or disease, you will need to express your dog. See your veterinarian to learn how to express your animal (it’s REALLY easy once you know how). If an animal’s bladder is not completely emptied several times a day, serious complications can result.
Fitting: How to Tell if the Dog Cart is Adjusted Properly
When the cart is adjusted properly, the animal stands in a ‘natural’ position. Basically, the dog wheelchair should relate to the dogs skeleton with the siderails supporting him like a spine and the wheels supporting him like legs. Here’s what to check. Refer to the figure below.
A – Knuckle at the hips. The knuckle – or the place where the legs join the frame of the dog cart, should be at the dogs hips. If you were to draw an imaginary line from one knuckle to the other, the line would pass right through the dog’s hips… where the bone of the leg meets the bones of the body. If not, tighten harness and/or adjust length. B – Front Support loop at the shoulder. There is naturally some downward pressure at the front of the cart. This is the normal pressure of standing. It is important that this weight be directly on the top of the front leg… where it is meant to be. The loop on the front harness that the bar goes through should be at the shoulder. Adjust the straps so that the loop is held firmly against the shoulder.
C – The dogs back needs to be straight or arched UP (slight hunch). The dog may need the Belly Strap.
D – The back legs need to be just touching, or just off the ground, depending on the health of the back legs. If the dogs wants to use his back legs, then allow his feet to touch lightly. This is often adjusted by tightening the straps that hold the harness to the frame – this brings the dog’s seat up. (Take the dog out of the harness before adjusting.) If the height of the harness cannot be changed, then lengthen the leg struts. Consider boots if the feet drag. Use the stirrups if the dog cannot use his back legs or the feet are dragging on the ground.
E – The horizontal bar needs to be level with the ground. If the cart itself cannot be adjusted, the harnesses can often be adjusted so that the horizontal bar is level with the ground – or even with the dog’s spine.
Reference Picture below:
For more information, see the www.DogKarts.com website